




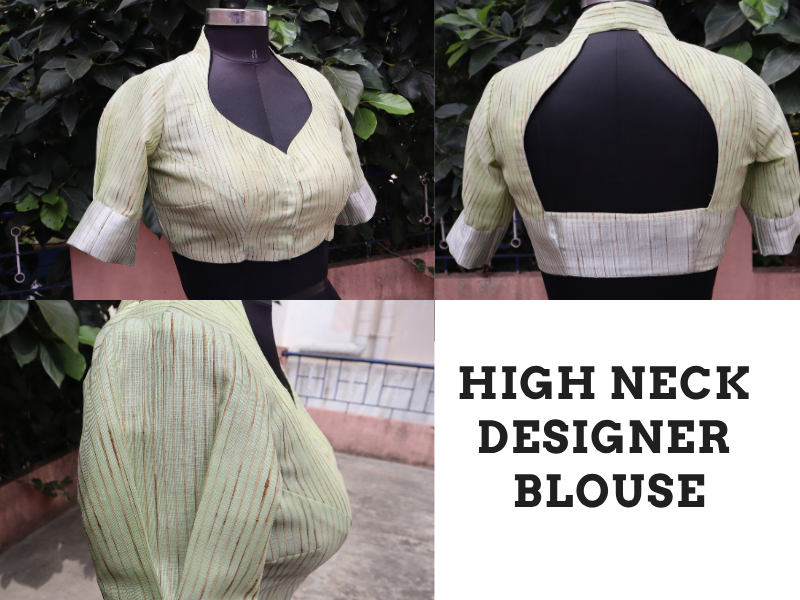
A high neck designer blouse is a blouse whose neckline sits high up on the neck, almost like a small collar that hugs your throat. It looks elegant, feels graceful, and pairs beautifully with silk and party sarees. If you have never sewn before, do not worry. In this guide we will go slowly, explain every word, and show you exactly how to cut and fit one at home.
What Makes a High Neck Blouse Different
Most blouses have a neckline that dips down at the front. A high neck blouse does the opposite. The fabric rises up to cover more of the neck. Because it sits so close to your body, a good fit matters a lot. A blouse that is too tight will feel choking, and one that is too loose will stand away from the neck and look untidy.
The word designer simply means we add a special touch, like a keyhole opening at the back, piping, or a decorative button. Do not let the word scare you. Underneath, it is still a normal blouse with a taller neckline.
Words You Will See in This Guide
Bust: the fullest part of your chest, measured all the way around.
Dart: a small folded and stitched triangle of fabric that shapes the flat cloth around your curves so the blouse fits nicely.
Seam allowance: the extra strip of fabric you leave outside your cutting line so you have room to stitch. Usually about half an inch to three-quarters of an inch.
Armhole: the curved opening where your arm goes through.
Facing: a matching piece of cloth stitched on the inside of the neckline to give it a clean, strong finish.
Step 1: Take Your Measurements
Before cutting anything, you need your body numbers. Wear a well-fitting blouse and use a soft measuring tape. Ask a friend to help so the tape stays straight and level.
Measure your bust (the fullest part of your chest, all around).
Measure your waist (the narrowest part of your middle).
Measure the front length from your shoulder down to your waist.
Measure your shoulder width from one shoulder bone to the other.
For the high neck, measure how high you want the neckline to rise. Two to three inches above the base of your throat is a common, comfortable height for beginners.
Write every number down. Accurate measurements matter far more than expensive fabric. A cheap cloth cut correctly will always beat costly silk cut wrong.
Step 2: Draft or Trace Your Pattern
A pattern is a paper shape you use as a guide to cut your fabric. You can draft one from your measurements, or trace an old blouse that already fits you.
Start with a basic blouse shape for the front and back. Then, for the high neck, raise the neckline curve on both the front and the back pieces. Instead of scooping the neck downward, draw it rising upward toward the throat. Keep the curve gentle and smooth, not sharp. The back piece usually needs a small opening, called a keyhole (a little slit closed with a button or hook), so you can slip the blouse over your head.
If drafting feels overwhelming, that is completely normal. Our High Neck Designer Blouse course walks you through the drawing step by step, with a teacher guiding every line. You can also explore the full range on our all courses page.
Step 3: Add Seam Allowance and Cut
Place your pattern on the fabric. Pin it so it does not slide. Now draw a second line about three-quarters of an inch outside the pattern edge all around. This extra strip is your seam allowance, the room you need to sew.
Fold the fabric so you cut two matching front pieces and two back pieces at once.
Mark the darts, the neckline, and the armhole clearly with tailor's chalk.
Cut slowly along the outer line. Long, calm scissor strokes give smoother edges than short, hurried snips.
Cut a separate facing strip that matches the shape of your high neckline. This will finish the inside cleanly.
Step 4: Stitch and Shape
Now the flat pieces become a blouse. Take your time here.
Stitch the darts first. Fold each marked triangle, pin, and sew from the wide edge to the pointed tip. This is what curves the flat cloth around your body.
Join the shoulder seams, then the side seams.
Attach the facing to the high neckline. Stitch it right sides together, then turn it to the inside and press. This gives the tall neck its neat, firm edge.
Finish the armholes and the bottom hem.
Add your back keyhole closure with a button and loop, or a small hook.
Press every seam with an iron as you go. Pressing is a small habit that makes a huge difference between a homemade look and a professional one.
Step 5: Try It On and Check the Fit
This is the most important part of a high neck blouse. Because it sits close to the throat, small adjustments matter.
Common Fitting Problems and Easy Fixes
Neck feels tight or choking: lower the neckline by half an inch, or loosen the back keyhole slightly.
Neckline stands away from the body: the curve was cut too wide. Take in a little at the shoulder seam.
Blouse rides up when you raise your arms: the armhole may be too tight. Trim the armhole curve a little deeper.
Wrinkles across the bust: your darts may need adjusting. Re-check that the dart tip points toward the fullest part of the bust.
Tips for Your First High Neck Blouse
Practise on plain cotton before touching your good silk. Cotton is forgiving and easy to handle.
Always keep a little extra seam allowance. It is easy to trim away extra cloth, but impossible to add cloth back.
Sew a quick test blouse, called a mock-up, from cheap fabric first. It shows you fit problems before you cut the real thing.
Go slow. Every experienced tailor was once a nervous beginner cutting their very first neckline.
Learn It Properly With By Bhavani
Reading a guide is a wonderful start, but nothing beats a patient teacher watching your hands and correcting you gently. With 15+ years of experience and classes in Kannada, our institute in Vidyaranyapura, Bangalore, makes designer blouses feel simple, even if you have never held a needle before. We teach both online and offline, at a pace that suits you.
Ready to stitch your own elegant high neck blouse? Join our High Neck Designer Blouse course or browse all By Bhavani courses. To enroll or ask any question, message us on WhatsApp at +91 70900 27905. We would love to welcome you as our next student.